Tales of a Wookie Wife: Fueled by caffeine and good intentions. Feed hairy man. Clean house. Be fabulous. Repeat. You can learn more about me here.

Wednesday, September 26, 2012

DIY Eyeshadow Palette

I wrote this post a few days ago, but it is pretty much irrelevant now as my awesome in-laws got me a collection of new eyeshadow palettes which I will show off with the second birthday haul post I now seem to require!  It's been a great one this year.  :)  Enjoy the tutorial, though, and if any of you reading had birthdays recently I hope yours was just as wonderful!

Lets not even lie.  We all have at least one of those MASSIVE eyeshadow palettes with something like half a billion colors on one huge, ungainly, usually pretty flimsy tray and on a day-to-day basis we don't use but a handful of the colors.

My solution was to take a small, really cute palette that had possibly the shittiest glitter and creme "eyeshadow" (using that term quite loosely as it was more like a lip gloss) and re-purposing the cute container for my most-used colors in the palette so I don't have to juggle the massive lunch-tray looking one every time I do my makeup.


Ok, so here is the tray containing the eyeshadow of shame.  I got excited to get rid of it and cleaned out 3 of them before I stopped to take the picture.  Cute container, though, solid pink on one side with a mirror and a little place for an applicator and I love how the front looks like bubbles.


First step, in case you haven't surmised, is remove the old, icky stuff from the palette of your choice.  I scooped it out with the applicator that came in it and into an old jar lid already bound for the trash as its accompanying jar seems to have gone on a joy ride somewhere.


Once your palette is empty, wash and dry it.
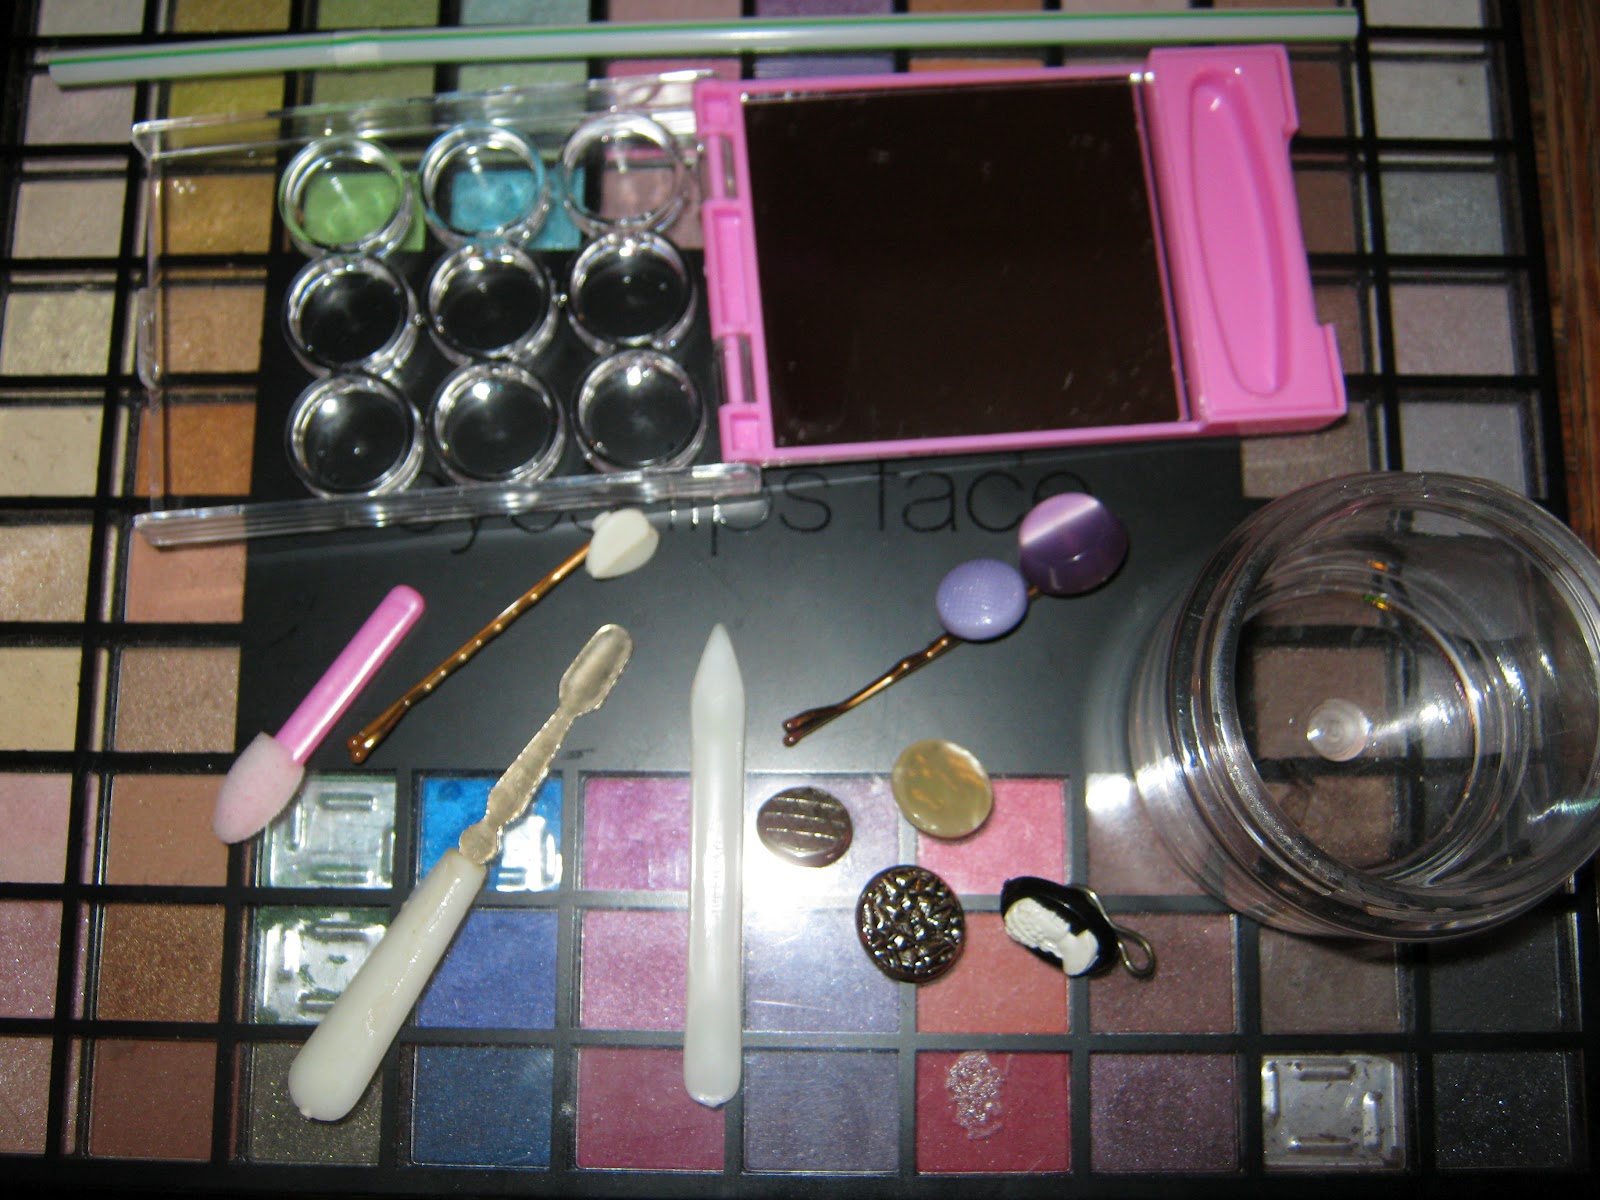
You will need:
  • your current palette
  • your new, clean, empty one
  • some buttons or something else with a flat surface
  • a few items with an interesting surface for pressing
  • a small container to break the eyeshadow up in
  • a straw
  • some implements to break up and scoop out the eyeshadow 
  • rubbing alcohol 
  • tissues or clean wash rags

There are more tutorials on the internet for pressing eye shadows than you can shake a stick at, but here's how I did it:


First, break the color you want to add until it isn't stuck to the little metal pan anywhere anymore, then empty it into your small mixing container.  If you're wanting to make a new blend of colors, then add the two or three you want to mix.  The little holders on the pink palette were large enough to hold two of the other ones, so I mixed the two most similar blacks and the two most similar whites on the palette since I use those colors the most.


Crush up the eye shadow cake until it is more or less all powder and, if using two, until they are mixed to your liking.  Hint:  You don't want any big chunks.


Scoop the powder into a space in your new palette.


Press it down flat-ish with the tip of your finger.  You can either wash your hands before every pressing since this is going near your eyeballs and all, or you can be lazy like I did and wrap a coffee filter around the tip of your finger before pressing.


Dip your straw into the alcohol container with your finger covering the end so it will hold some of the alcohol.  Or use an eyedropper if you're getting fancy.  Add 3 or 4 drops to the pressed powder, just enough to moisten it.


Then, take a flat button and pat the eye shadow, being sure to get the edges as well, until it is flat.


Next, since I firmly believe everything should be as cute as possible, take buttons, or whatever you can find with an interesting pattern cut into it, and gently press that into the cake to leave an imprint.


Wipe off your stabby implement of choice and your crushing container and repeat with all your favorite, most-used colors.


Done!  Pretty quick and much more cute and easy to handle than the uber-palette.

<3WW

Tuesday, September 25, 2012

Nail Pledge Manicure #4 - Lok'tar

You guessed it.  This manicure is WoW-inspired.


I started off with 2 coats of Pure Ice in Siren and 2 coats of Kleancolor in Metallic Yellow on my ring fingers.


Then, I figured out that if you use the cut end of tape, it leaves a spiffy jagged edge, so I taped the tips of my nails off.


Then, I painted over it with a coat of Metallic Yellow...


...And yanked off the tape.


Here's where we're at so far.  Now for the logo.  :)


First off, draw a horseshoe/keyhole shape with little feet on your nail.  I used Kleancolor in Black with a nail art brush salvaged from an old nail art paint.


Next, draw a triangle over it with the ends of it going to the widest point in the loop.


Fill in any gaps created by the triangle and give it horns.


Next, add the diamond inn the middle and the little arms...Mine's a little fucked up.


FOR THE HORDE!

:)

<3 WookieWifey

Sunday, September 23, 2012

Nail Pledge Manicure #3 - Gold Glitter

I figure its time to start testing out and reviewing all the amazing nail polishes the Wookie got me for my birthday.  I'd tried a color out before this one, but I didn't seem to get any pictures of it.  It will be used again, though, so we're safe there.

This is what I went with this time:


This beauty is 24 Carat.  Tiny gold glitter and holo glitter with pink-toned holo diamonds floating around inside.


I layered two coats of it over two coats of Americano, a golden, sandy metallic.  As you can see, my nail growing pledge is giving me pains as I had a nail break and had to file a bit.  Still at it, though.


And it glistened like mad.  I wish any of these pictures showed it justice.


These Kleancolor nail polishes go on beautifully.  This brand should get more recognition that it does, imo.

<3 WW

Saturday, September 22, 2012

Birthday Stuffs!

So it isn't even my birthday yet and the Wookie has been hard at the present-buying thing already.  Time to show some of it off!  <3  :)


First off, Koji lashes.  I've had these on my wishlist in various forms for quite some time.  I wasn't disappointed.


I'm a n00b, but these were still fairly easy to apply and looked soooo cute.


The glue was much better than the other brands I've tried (with my vast experience of two), and they stayed in place until I took them off.


Dylan Dog!  Ok, yes, I'm a nerd.  I'd been wanting the Case Files book for SO LONG.  I'm a bit over half through it and it rocks.  He got me the movie too, which is awesome in its own right, although not much like the comic.

Le grande finale...


SQUEE!  A 46-piece Kleancolor collection!  Top half...


Bottom half...


...And group photo!  TONS of amazing glitters, cute pinks, and quite a few holos in there, too.  Basically, you should stay tuned for a metric fuckton of manicure posts and reviews.


The kit also came with 3 of these in varying scents.  These things are amazing.  I took off four coats, two of which were glitter with one pad earlier today.  They feel dry but somehow work very well and even smell nice.

Whew.  So all that and not even officially my birthday yet.

O.O

<3 Wookie Wifey

Friday, September 21, 2012

Pure Ice Magnetic Review and Manicure

*Product purchased by me for personal use, opinions are my own.

Not many pictures of this one, but I am keeping up with my nail growing pledge...Which will become way more evident soon.  I'll be soon unveiling the amazing early birthday present the Wookie gave me and that will pretty much turn this blog into a nail blog temporarily!  However, with the nail growing pledge its quite good timing.

For now, let's talk about this stuff...


...Because this stuff is the shit.  It is every bit as awesome as its Sally Hansen counterpart and its about $3 cheaper, so win there.  (I still love my Sally Hansen one, but when you can get the same thing cheaper, then you do the math.)  This is green star or some shit, I don't remember and I'm too lazy to get up and look right now, but it looks awesome and I look forward to using this pattern magnet on my Sally Hansen purple.


As with the other brand, you have to follow the instructions to the letter to get the results, but they are worth it.  Drying time wasn't too bad at all and it lasted a few days, which with how hard I am on my hands is a win.  I put the magnet in a bit of a different place each time to try to get different patterns...My pinkie just ended up as a stripe basically because this pattern is rather large and my pinkie nail is rather...not.

I apologize for the crappy clean-up.  I was still out of nail polish remover from the water marbling fail at this point.  /facedesk

Also, if you're keeping track, I believe this is manicure #2 for my official nail-growing pledge and this was about a week from the first one...I've done two more since then, but I'm a bit behind, what can I say?

So many tons of awesome stuff to post about in the near future as its getting close to my birthday and, as I mentioned, the Wookie has already had gifts rolling in.  Can't wait to show them off!

<3 WW

Friday, September 14, 2012

Organic Bath Co. Better Body Butter Review

**Product paid for by me for personal use, reviews 100% honest opinions!

I picked this body butter up in a little kit of various Organic Bath Co. products at a discount store for a buck.  I'd never heard of the brand and can't find anything about it online much except that an 8oz tub of this stuff is about 13 bucks, which I isn't my definition of "affordable", but I'm broke and cheap, but if I were rich I'd buy it and if I see it in a closeout store again, IT IS MINE.

The kit was pomegranate-fig scented, which smells decidedly delicious, and came with bath salts (pretty good, smelled great, but how can you fuck those up?), bath gel (again, good, I'd say average bath gel quality), body scrub (didn't care for that one one little bit, it was runny and felt sort of slimy), and this Better Body Butter.


Here is the body butter, and they aren't kidding about the 'butter' part or the 'better' part.  This stuff is THICK.  Here's your proof:  When I bought the kit, due to the convenient, cute size of the jar, I tossed it in my bag...And promptly forgot about it for around a month.  After that long of bouncing around in my bag, which, I assure you, I am NOT gentle with and gets slung everywhere, it looked like this when I rediscovered it cleaning out my purse:


Yeah.  Still pristine and you can even see the pretty little swirls where it was filled up.  I'd expected to open it and have hell keeping it contained with half it on the lid, but NOPE!


Here's a shot from just the other day, maybe 2 weeks later.  Hard to tell, but its almost gone, and as you can see from the light on the ceiling, in case you needed further proof, this picture was taken upside-down.

This stuff goes on so well...No greasy feeling AT ALL, which is very important to me as the last thing I want to feel when I first get out of a bath is like I've rolled in a vat of Crisco.

Since there is very little left I'm using it currently only as a hand creme, but I did use it on my legs a few times after shaving and it didn't cause the usual lotion-after-shaving red bums I get from most lotions and cremes.  I also slathered it on then put some socks on before bed and noticed I had very silky feet the next day.

Over all, this was the best product in the bag and if you see it around at a price you can afford, go for it!

<3
Wookie Wifey

Monday, September 10, 2012

Nail Growing Pledge Official Post 1

**All colors were paid for by me, no promotions or anything, just my honest review on products I purchased.

If you read my Water Marbling Manicure FAIL post, then you know I jumped on Violet's nail-growing pledge bandwagon and decided to also pledge to try to grow out my flaky, chippy, breaking-prone nails as well!

Since my first manicure was atrocious, I slapped on a clear coat in frustration and started over the next day and did this one instead.  (note, excuse the crappy mistakes because if you read the previous post you'll also remember I'm out of nail polish remover thanks to that epic fail.)


This also gives me a chance to review what may be one of my favorite nail polishes of all time:  Wet N' Wild Wild Shine in Sparked.  I'm sure you can tell how awesome it is by how little is left in the bottle, and just so you know, I spent about 45 seconds going through my files to find the picture to enlarge it to see the name of the color before I realized it was still sitting right next to me on the table.  Oops.


I wish any of these pictures captured how amazing sparkly this stuff is.  This color combo just...works.  I can't explain it any better than that.


This is with only a clear base coat and three coats of the glitter - it goes on that solidly.  When the bottle was still pretty full, it only took two to reach that opacity.  It goes on like a dream and actually has a bit of lasting power, which is odd for me with how hard I tend to be on my hands.


Here it is in the sunlight...Its so sparkly...Hello nail polish bottle porn.


Here's the number of that prettiness up there, and the Chocolate is the color I used on the other nails, which I also love.  It is so very deliciously retro.


It is Sally Hansen Hard as Nails, and it does take quite a bit of time to dry, and if you don't let it dry completely between coats it tends to get streak-y, but I put up with it because I adore the color.


MOAR PICTURES!

Here are a few in the sunlight.


This one captures the sparkle of Sparked the best.  It is truly one of my very favorites of all time...The bottle is almost empty and I haven't even had it for a year yet.  >.<  I think I paid about 3 bucks for it, which was worth every penny.  If I ever see this again, I will probably buy every bottle they have.  The Chocolate was $2 on sale and worth it as well even with the streak issues.

We'll just have to see how my nail-growing progress goes, I guess.

<3 WW

Sunday, September 9, 2012

Water Marbling Manicure FAIL!


I was quite excited when Violet LeBeaux decided to do a nail-growing pledge and I decided to jump in on the fun!  I figured the perfect way to start would be a manicure and I'd been dying to try water marbling, so I went to give it a go.  I used the above colors as I wanted to go for sort of a fire-y look that would be nice for fall.  I was out of white nail polish (EEK), so I used the base coat, then two coats of the neon yellow since it was the lightest of the bunch.

After MANY tries of the dropping and mixing I finally got it to  marble okay, got super excited, and dipped a falsie glued to a nail tool into the bowl for a test run.  This is what I got:


I was STOKED!


Looks awesome, huh?  Unfortunately, that is where the awesomeness ends.  :(

Try after try, I couldn't make it work again.  I tried it with a few other falsies, too, but to no avail.  This is how my other ones turned out:


Yeah, I gave up after those two and went another route, which I will post soon.

No matter how many times I tried, this just kept failing except for the one anomaly up there.  When I'd drop the colors in the water, they wouldn't expand like they do in the various youtube videos, and it was every brand I used, not just one or two.  Once in a blue moon, they would expand, but usually not very much, and when I'd go to swirl, it would all come out in one, nasty, odd clump instead of swirling together.  I never could come even close to the falsie picture...My thumb looks okay int he above picture, but what you can't tell is that there was a massive clump of wadded-up, gloppy nail polish on the end.


By the time I finished, I had the above mess (times about 3, as I threw away 2 other hand fulls), and no longer had any nail polish remover left.

So, FAIL.  Any tips on how to make this work?

At any rate, these are my starting pictures of my nail-growing-out endeavor.  They chip incredibly easily and one already has, so I'll be filing that one down a little, but here goes nothing, and thanks to Violet for the inspiration.

<3 The Wookie Wifey...Who will soon post a not-fail, cute mani!  :)