As much as I was disappointed with the other Wet-n-Wild kit I got, I was equally, if not more so, thrilled with the glitter tattoo kit I got on clearance. It was way more awesome than I expected it to be and lasted a lot longer, too. Why the hell do I need glitter tattoos when I have lots of real ones? Because glitter is a good excuse for doing anything at all, that's why!
This is what came in the kit - stencils (there were 4, I think), glitter glue, glitter in black, red, and purple, and a brush.
First, peel the back off the stencil and stick it on where you want the tattoo to be.
Then, working quickly, apply the glue, then dab glitter over it. I didn't even use the brush, just used my finger.
Peel off the sticker and there you have it! One leg didn't come out so great as I didn't work fast enough and the glue dries pretty quickly, but it still came out cute. It looks lighter with the flash, but live it was super dark black and deliciously shiny.
On this second picture I'd had this puppy on about 16 hours. I put it on the inside of my wrist because I wanted to see how well these would hold up in an area that tends to brush clothing and such a lot....AND I took a nap before I took this picture, so you guys would know these really do stand up to abuse well. I had to scrub it off in the tub.
These kits definitely get an A+ in my book! They last so much longer than I thought they would and I am confident I could wear these out with a spiffy look and not have to worry about them wearing off during the day.
<3
WW
Tales of a Wookie Wife: Fueled by caffeine and good intentions. Feed hairy man. Clean house. Be fabulous. Repeat. You can learn more about me here.
Friday, December 7, 2012
Wednesday, December 5, 2012
Christmas Nails!
I got this idea when I saw all4one1fourall's youtube tutorial. I liked hers, but I suck at drawing bows in the very worst way, so I decided to do a bit of a different spin to it. By the way, check out her channel if you haven't seen it. I love it because, like me, she isn't afraid to wear bright, daring makeup colors out with no special occasion. Usually when you see a colorful makeup tutorial there's something along the lines of "this obviously isn't an everyday look, its too dramatic" and you know what I have to say to that? WHO CARES? Its MY face and if wearing bright red or neon pink eye shadow makes me happy, that's damn well what I'm going to do. Life is way too short to run around worrying about what other people think.
Onwards to the tutorial!
First, I started off with my basic colors.
Then, I started adding the little dots for the wreath. I ended up with 9. Just put them in a little circle. That thing balanced on my hand is my dotter. I saw somewhere on pinterest that you could make your own by shoving sewing pins into erasers and it works great. I had pins with different sized heads so I ended up with 3 different size dotters. FOR FREE from stuff I already had lying around, YAY!
Then, to add more color, I did the tips in the sparkly green. I just free-handed it, but you can use reinforcements, rubber bands, or tape if you need to.
For the tree, I took a nail art brush and just added little swipes all the way down to where I wanted it to end.
After that was all dry, I took my smaller dotters and started adding ornaments to everything.
I just kept adding dots until it got where I wanted it and added a gold dot at the top of the tree because don't even get me trying to draw a star.
For the bow, this is what I used, and there's a shot of it next to my nail so you can see how teeny it is. I made three of these last time I did a batch of salt dough for 3-D Hello Kitty nail art, but decided the red one would be perfect for this since I suck at the whole bow-drawing thing. I just rolled the dough into a tiny piece, then squished it a little at a time until it formed a rough bow-like shape, then used my nails to make little indentations for the middle and painted it with red nail polish once it was dry.
A dab of nail glue to the back and there we go! 3D nail art Yule nails!
Here's a close-up so you can see the bow better. At this point you'd usually put on a clear coat, but I don't have any except the one crappy one that smudges EVERY-FUCKING-THING, so this will have to do! :)
Hope you like it and let me know if you give it a shot, I'd love to see pics!
By the way, yes, I realize one nail is killer longer than the others. I've never had a nail get that long and I don't have the heart to file it down!!! I can get away with it because it's usually my accent nail, right? Right?!
<3
WookieWifey
Onwards to the tutorial!
First, I started off with my basic colors.
Then, I started adding the little dots for the wreath. I ended up with 9. Just put them in a little circle. That thing balanced on my hand is my dotter. I saw somewhere on pinterest that you could make your own by shoving sewing pins into erasers and it works great. I had pins with different sized heads so I ended up with 3 different size dotters. FOR FREE from stuff I already had lying around, YAY!
Then, to add more color, I did the tips in the sparkly green. I just free-handed it, but you can use reinforcements, rubber bands, or tape if you need to.
For the tree, I took a nail art brush and just added little swipes all the way down to where I wanted it to end.
After that was all dry, I took my smaller dotters and started adding ornaments to everything.
I just kept adding dots until it got where I wanted it and added a gold dot at the top of the tree because don't even get me trying to draw a star.
For the bow, this is what I used, and there's a shot of it next to my nail so you can see how teeny it is. I made three of these last time I did a batch of salt dough for 3-D Hello Kitty nail art, but decided the red one would be perfect for this since I suck at the whole bow-drawing thing. I just rolled the dough into a tiny piece, then squished it a little at a time until it formed a rough bow-like shape, then used my nails to make little indentations for the middle and painted it with red nail polish once it was dry.
A dab of nail glue to the back and there we go! 3D nail art Yule nails!
Here's a close-up so you can see the bow better. At this point you'd usually put on a clear coat, but I don't have any except the one crappy one that smudges EVERY-FUCKING-THING, so this will have to do! :)
Hope you like it and let me know if you give it a shot, I'd love to see pics!
By the way, yes, I realize one nail is killer longer than the others. I've never had a nail get that long and I don't have the heart to file it down!!! I can get away with it because it's usually my accent nail, right? Right?!
<3
WookieWifey
Tuesday, December 4, 2012
Wet-n-Wild Makeup Review Update
***Click here to read the original post.***
I think this is the first time I've been so let down by a product that I posted a follow-up review, but here goes: In my post-Halloween haul, I'd bought a Wet-n-Wild Fantasy Makers kit. I'd torn open the package before I remembered to take the first picture, but it was the Bewitching Beauty kit.
I bought it so excited to see what it looked like as it appeared to be glitter cream shadows with LOTS of glitter. The first swatch I did turned out just like I'd hoped, even though the glitter didn't show up in the picture. It wasn't until about a week later when I went to wear the colors that I realized the pretty sparkle was only on the top layer.
Here, you can see what I'm talking about. Not only is the glitter only on the top, but the colors seem to completely change after the top layer.
Close-up so you can see how there is NO GLITTER after the top layer. It would have been better had they just included some eye-safe glitter to put over the top of the cream or pretty much anything other than just "Oh look, glitter!" to draw you in then dashing your glittery dreams.
I did find out, however, that you can use these with an angle eyeliner brush just as a cream liner, which is okay, but not what I wanted at all, so beware when you buy their products that they may not be what they appear to be. :( However, I do have a great review for the glitter tattoo kit by them I bought which I will post later!
<3
WW
I think this is the first time I've been so let down by a product that I posted a follow-up review, but here goes: In my post-Halloween haul, I'd bought a Wet-n-Wild Fantasy Makers kit. I'd torn open the package before I remembered to take the first picture, but it was the Bewitching Beauty kit.
I bought it so excited to see what it looked like as it appeared to be glitter cream shadows with LOTS of glitter. The first swatch I did turned out just like I'd hoped, even though the glitter didn't show up in the picture. It wasn't until about a week later when I went to wear the colors that I realized the pretty sparkle was only on the top layer.
Here, you can see what I'm talking about. Not only is the glitter only on the top, but the colors seem to completely change after the top layer.
Close-up so you can see how there is NO GLITTER after the top layer. It would have been better had they just included some eye-safe glitter to put over the top of the cream or pretty much anything other than just "Oh look, glitter!" to draw you in then dashing your glittery dreams.
I did find out, however, that you can use these with an angle eyeliner brush just as a cream liner, which is okay, but not what I wanted at all, so beware when you buy their products that they may not be what they appear to be. :( However, I do have a great review for the glitter tattoo kit by them I bought which I will post later!
<3
WW
Thursday, November 29, 2012
Yule for Geeks
Christmas/Yule can be a tricky time if you're particularly nerdy, specifically if you don't care for a lot of the normal decorations you can get at the store. If you've been reading for more than about 3 seconds then you've probably already surmised that my solution is to just make stuff my damn self! ^_^
Enter: the nerdy Christmas stockings!
For this project, I used some super fugly pants I found at a thrift store. These are some horrid, high-waisted, '90's numbers. And these are junior's sizes, guys. Yeah, you heard that right. Some poor child probably got sent to school in these odd, badly cut, awkward, cropped-length pants. One pair even had -gasp- PLEATS! THE HORROR!
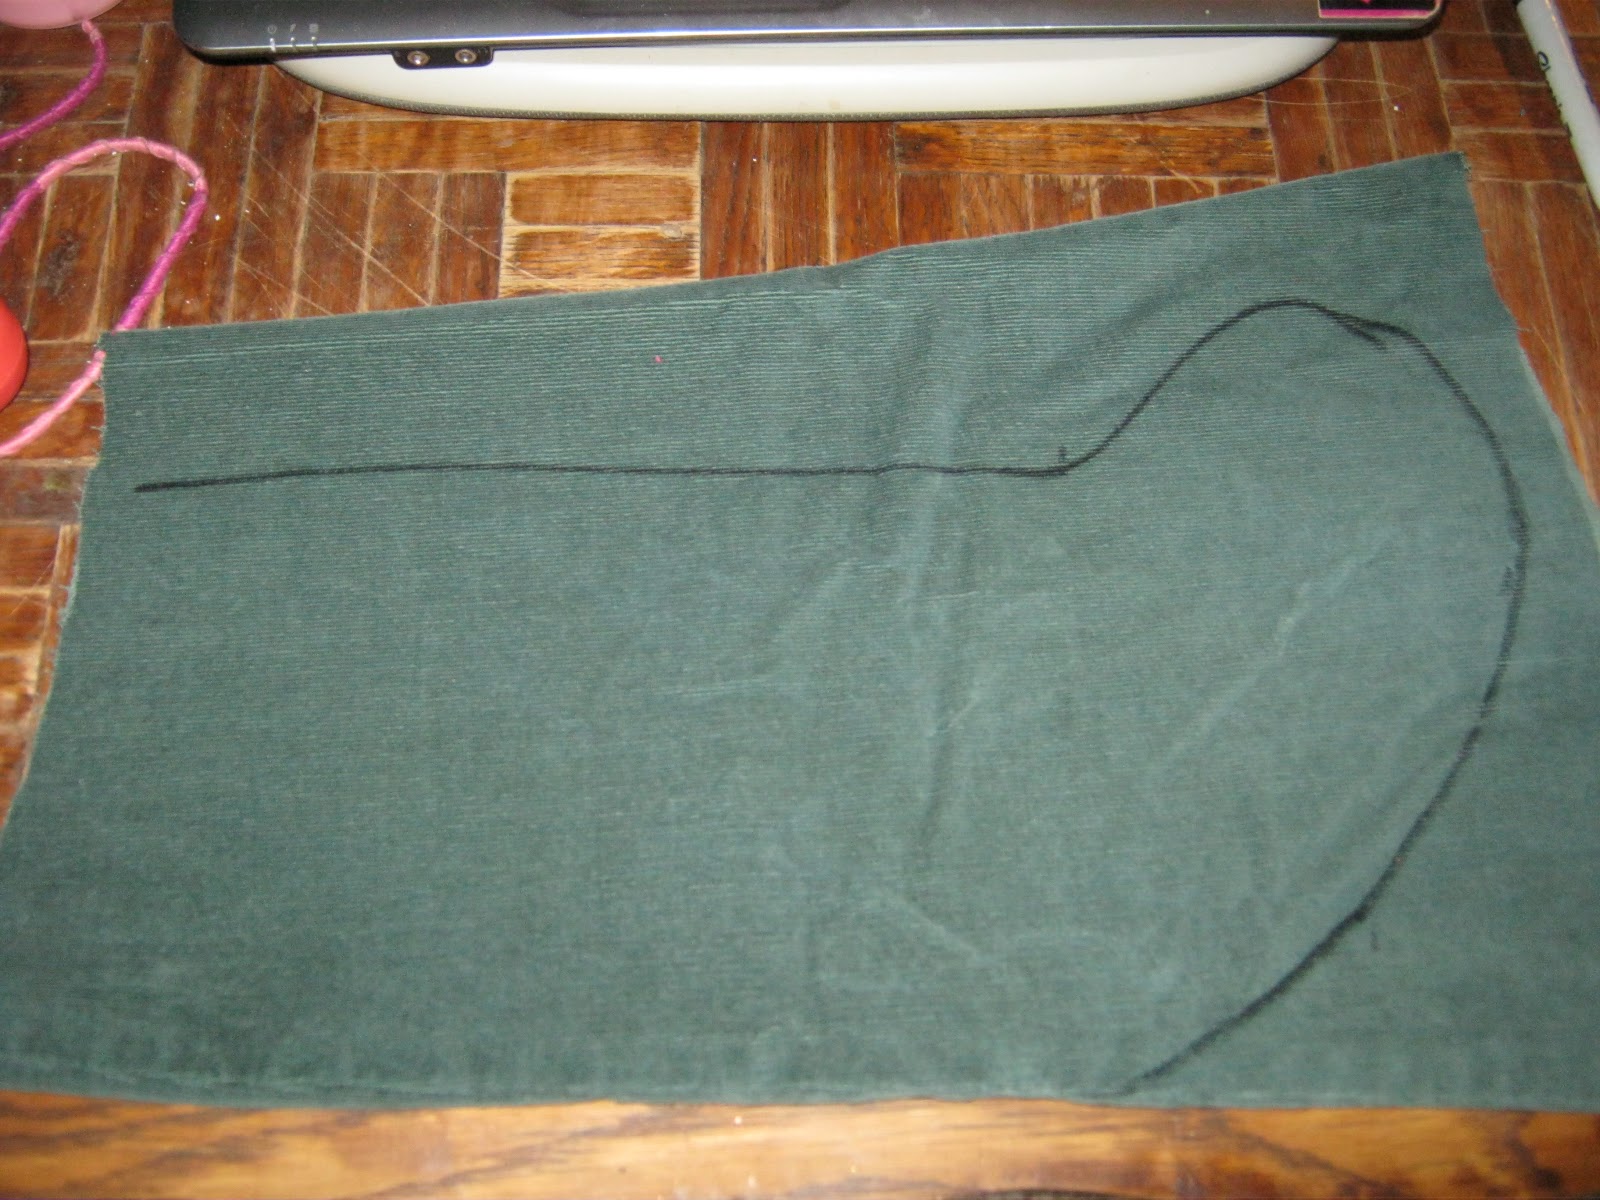
Anyway, cut off the part you want to use and draw a rough stocking shape. I tried to use as many existing hems and seams as I could since I'm not the best seamstress in the world. Okay, okay, I may be the worst. Still, here goes:
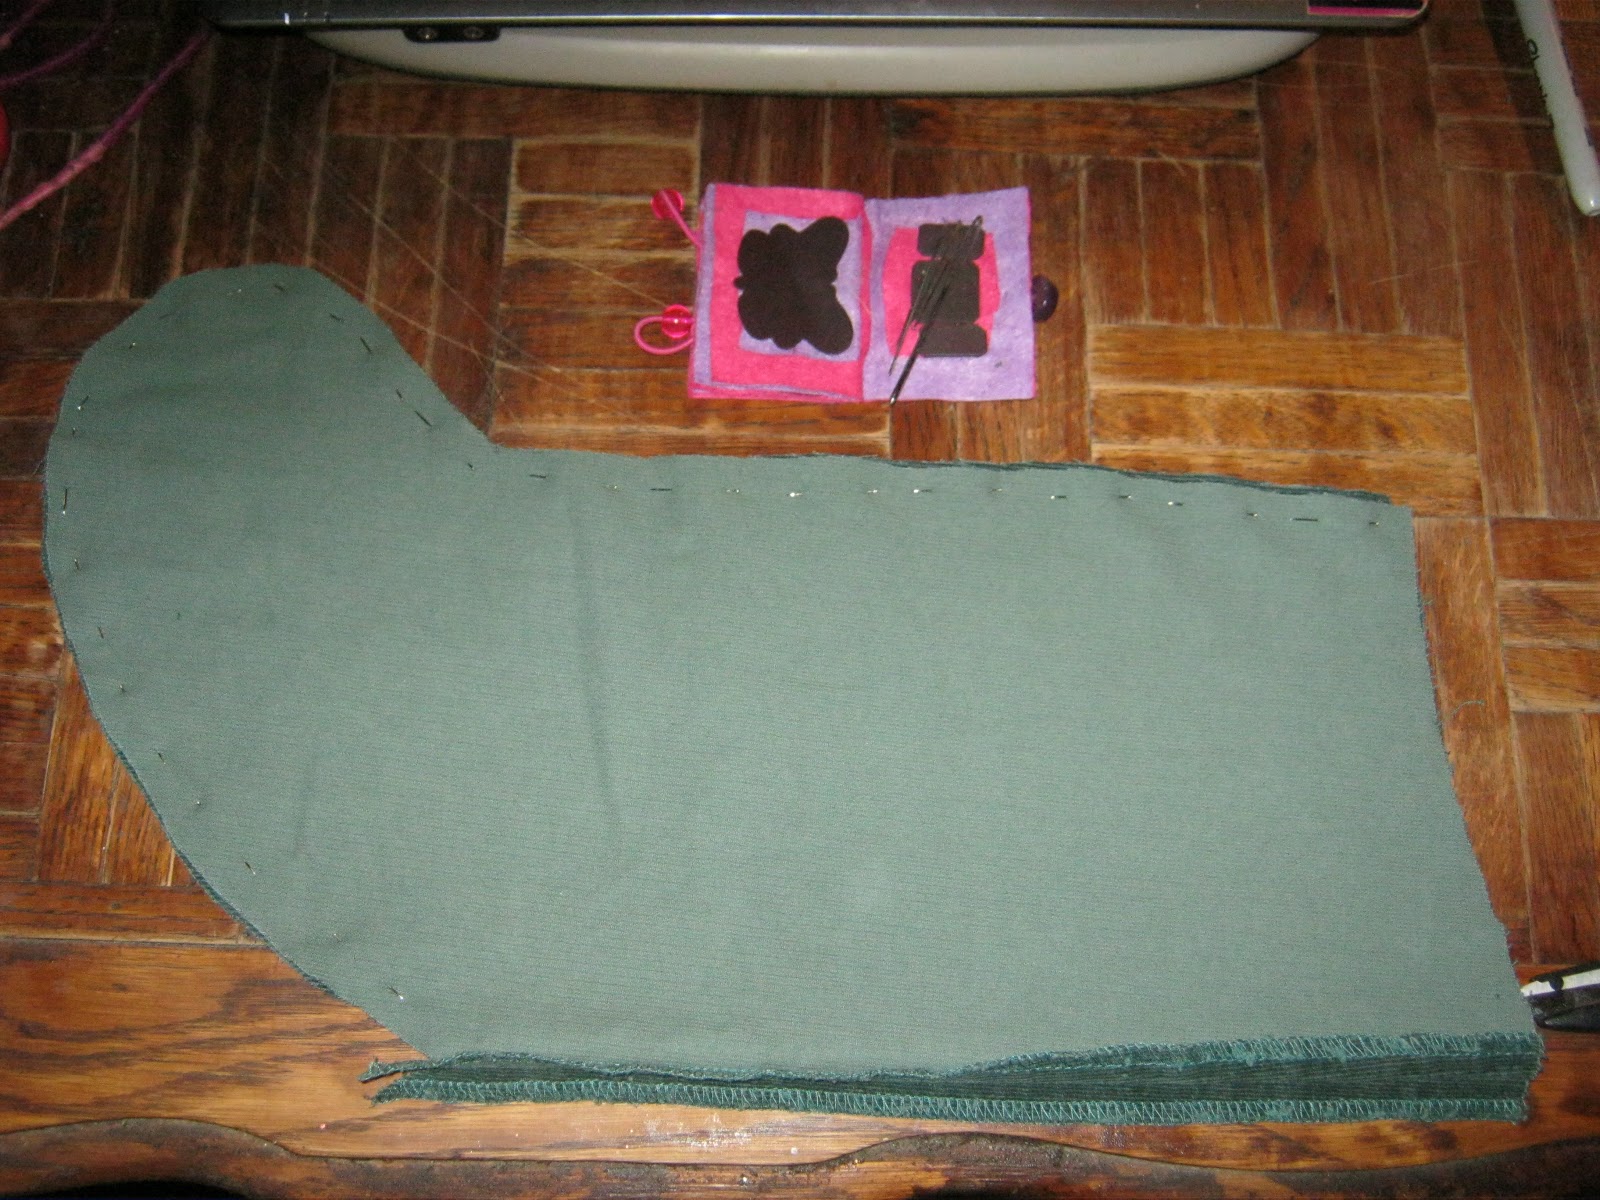
Cut that puppy out, flip it inside-out, and pin it.
Thread your needle...Since I only had this thread (sad, I know), I doubled it so that it would be nice and thick. On some I used embroidery thread since I ran out of my ONE spool of thread. /facepalm
Stitch it up, then flip it back right-side-out.
Next, choose what nerdy emblem you want on it and cut that out of another fabric of choice. I chose felt and I didn't use a pattern or anything, just drew the shape directly onto the felt then cut it out.
Time to heat up that glue gun!
While that's heating, cut out some small strips of felt, loop them around, then glue them together as seen above so it forms a loop to hang them from. Glue everything on.
NERDY YULE! Here's some snapshots of all the ones I did:
These are hung now and are just too damn cute with my nerdy salt-dough ornaments I made for our tree! *-*
<3
WW
Enter: the nerdy Christmas stockings!
For this project, I used some super fugly pants I found at a thrift store. These are some horrid, high-waisted, '90's numbers. And these are junior's sizes, guys. Yeah, you heard that right. Some poor child probably got sent to school in these odd, badly cut, awkward, cropped-length pants. One pair even had -gasp- PLEATS! THE HORROR!
Anyway, cut off the part you want to use and draw a rough stocking shape. I tried to use as many existing hems and seams as I could since I'm not the best seamstress in the world. Okay, okay, I may be the worst. Still, here goes:
Cut that puppy out, flip it inside-out, and pin it.
Thread your needle...Since I only had this thread (sad, I know), I doubled it so that it would be nice and thick. On some I used embroidery thread since I ran out of my ONE spool of thread. /facepalm
Stitch it up, then flip it back right-side-out.
Next, choose what nerdy emblem you want on it and cut that out of another fabric of choice. I chose felt and I didn't use a pattern or anything, just drew the shape directly onto the felt then cut it out.
Time to heat up that glue gun!
While that's heating, cut out some small strips of felt, loop them around, then glue them together as seen above so it forms a loop to hang them from. Glue everything on.
NERDY YULE! Here's some snapshots of all the ones I did:
| A Halo one I did for a friend. |
| Mario star for another friend... |
| Second Star Trek one for yet another friend. Its good to be my friend. |
| Hubs' Mass Effect stocking on the left and my Star Trek one on the right! |
These are hung now and are just too damn cute with my nerdy salt-dough ornaments I made for our tree! *-*
<3
WW
Wednesday, November 28, 2012
Loaded Baked Potato Soup
Yeah, yeah, I know...I'm seriously lacking in posting recipes lately and I'm going to work harder to post more, but a lot of times I forget to take pictures when cooking. Sue me.
For this soup, you'll need about 10 large potatoes, one cup of shredded cheddar cheese (half a bag), 6-9 slices of bacon, 1/2 a stick of butter, and about a cup of green onions. Usually I chop the green onions myself, but the whole ones at the store just looked awful, so I had to get these stupid diced, pre-packaged ones. Boo.
Step 1 - Melt half the butter.
Dice all the potatoes and set aside about 2-3 potatoes after dicing.
Put the remaining diced potatoes into a large bowl, season with sea salt and black pepper, then pour the butter over them and toss them until they are all coated.
Put your oven on broil and lay the potatoes on a pan or cookie sheet and slap them in the oven until they are golden brown on one side. Flip them all over and let the other side get all golden-y. Roasting them will help them hold together in the soup and will make the leftovers keep for several days (or freeze) without turning into a cream-of-potato-and-mush soup.
While those potatoes are roasting, take the 2-3 that you reserved and put them in a large stock pot with enough water to cover them by about an inch and boil them. At this point you're thinking "why the fuck am I roasting AND boiling", right? We'll get to that.
While those are boiling, fry the bacon up then chop it...Or tear it apart, whatever makes you giddy.
Once the potatoes are boiled to the falling-apart point, remove and drain them, reserving the liquid - we'll put that back later.
Mash the boiled potatoes up, then mix the liquid back in and put it back into the stock pot with the remaining butter. What this does is creates a thick, creamy base for the rest of the ingredients to bathe in. If you're uber lazy you could skip the boiling and just use water and enough instant mashed potato flakes to thicken it, but I'd consider that a crime against humanity. You have been warned.
Toss in the roasted potatoes, onions, bacon, and cheese....Oh yeah. Now things are looking good. At this point they should also be smelling so divine you're ready to chew on your own shoe.
That's all there is to it.
Top it with a bit of extra cheese and onions if you feel fancy. The recipe is much easier than it sounds and this amount usually lasts us 4-5 days.
<3
WW
For this soup, you'll need about 10 large potatoes, one cup of shredded cheddar cheese (half a bag), 6-9 slices of bacon, 1/2 a stick of butter, and about a cup of green onions. Usually I chop the green onions myself, but the whole ones at the store just looked awful, so I had to get these stupid diced, pre-packaged ones. Boo.
Step 1 - Melt half the butter.
Dice all the potatoes and set aside about 2-3 potatoes after dicing.
Put the remaining diced potatoes into a large bowl, season with sea salt and black pepper, then pour the butter over them and toss them until they are all coated.
Put your oven on broil and lay the potatoes on a pan or cookie sheet and slap them in the oven until they are golden brown on one side. Flip them all over and let the other side get all golden-y. Roasting them will help them hold together in the soup and will make the leftovers keep for several days (or freeze) without turning into a cream-of-potato-and-mush soup.
While those potatoes are roasting, take the 2-3 that you reserved and put them in a large stock pot with enough water to cover them by about an inch and boil them. At this point you're thinking "why the fuck am I roasting AND boiling", right? We'll get to that.
While those are boiling, fry the bacon up then chop it...Or tear it apart, whatever makes you giddy.
Once the potatoes are boiled to the falling-apart point, remove and drain them, reserving the liquid - we'll put that back later.
Mash the boiled potatoes up, then mix the liquid back in and put it back into the stock pot with the remaining butter. What this does is creates a thick, creamy base for the rest of the ingredients to bathe in. If you're uber lazy you could skip the boiling and just use water and enough instant mashed potato flakes to thicken it, but I'd consider that a crime against humanity. You have been warned.
Toss in the roasted potatoes, onions, bacon, and cheese....Oh yeah. Now things are looking good. At this point they should also be smelling so divine you're ready to chew on your own shoe.
That's all there is to it.
Top it with a bit of extra cheese and onions if you feel fancy. The recipe is much easier than it sounds and this amount usually lasts us 4-5 days.
<3
WW
Tuesday, November 27, 2012
Spiffy Makeup Discovery!
Occasionally we all have an amazingly simple idea that, when we think of it, it is quite like being hit in the head and we immediately think "Why didn't I think of this earlier?!"
My most recent of these ideas occurred when I bought a nail stamper. After playing with it for a week or so, I started to think of other things I could do with it. Using it to stamp cute little things on craft projects was the most obvious (and, yes, it works), however I got an even bigger idea:
SO SIMPLE, right?
Eyeliner + stamping plate =
I'm betting this would come out way better with a cheaper liquid liner that takes a bit longer to dry or perhaps even a gel liner.
Yay for easy ideas. This will make makeup even MORE fun.
<3
WW
My most recent of these ideas occurred when I bought a nail stamper. After playing with it for a week or so, I started to think of other things I could do with it. Using it to stamp cute little things on craft projects was the most obvious (and, yes, it works), however I got an even bigger idea:
SO SIMPLE, right?
Eyeliner + stamping plate =
I'm betting this would come out way better with a cheaper liquid liner that takes a bit longer to dry or perhaps even a gel liner.
Yay for easy ideas. This will make makeup even MORE fun.
<3
WW
Sunday, November 11, 2012
Random Photo Post - Thrifted!
I adore thrift stores. Also, garage sales, junk shops, antique stores, flea markets...Pretty much any place I can get a bargain. I just simply don't see the point of over-paying for new items that are usually so shoddily made that they will fall apart next week. There are things I do prefer to buy new, but for a lot of things...Just take me to the thrift store, I'll be fine.
Part of it is the price, part is the fact that these things are perfectly good and need homes and a lot of great items get discarded just because they aren't someone's taste, and the other thing that factors into the fun is the thrill of the hunt. There's nothing like pawing through a huge pile of what appears to be crap and finding a Vera Wang skirt or a Wedgewood tea cup (true stories, guys, I've found both!)
With that out of the way, I'd like to show off my first of many, many editions to come of a Thrifted edition of the usual monthly random photo post!
This cup was found at a yard sale...I think I paid 25 cents for it. I loved the bright colors and the retro print!
This, I love ever so much. I bought two of these and, in fact, one is sitting right next to me with tea in it at the moment. They are the perfect size for tea and I think they are adorable. I got them at the same yard sale as the above one, and both were 50 cents, so that's less than a buck for 3 cups.
I am a fanatic of all things Batman. A fanatic who has no idea why my pictures look fine on my computer then once in a blue moon one comes out all odd like above the second I upload it to blogger. Penguin up there was 2 bucks, by the way. No, I will not be removing it from the packaging. What kind of nerd do you take me for?
This awsome little blacksmith I got from the guy who makes all the other awesome stuff I blogged about months ago at the local flea market. He's recently started adding in these little sculptures and this is my favorite one I've seen up there so far so I'm so very glad to have him.
These. Oh god, these. Aren't they cute?! I'm guessing these were from the '50s - '60s judging by the box they were in. It had no date on it, but they came in their original box. I paid a buck for them and they were still brand new, though I didn't get a picture of the box they came in as it was a bit beaten up. They fit, though, and are very cute and comfortable to wear around the house when its not quite cold enough for fuzzy slippers, but not quite warm enough for bare feet.
Monet print...$1. Yeah. Will probably be painting these frames, though, not a fan.
Other Monet print...Also $1. Beat that. Please excuse cat hanging from camera strap. These are older pictures. Cat attacked EVERYTHING.
Oh look! Another picture fucked up!
This jewelry box is one of my favorite things ever. Hubs bought this for me at the flea market as the second I saw it, I fell in love...I think his reasoning was it was probably easier to buy it then and there than to watch me lament over the loss of such a good find for the next month. That, and it was only $20 and it was near my birthday/a holiday (can't remember which, I'm good like that) It is leather-covered wood and, let me tell you, I can fit some serious goodies in here, this puppy is HUGE.
Shot of the top...The corner designs are sort of pressed in.
Doors open to reveal lots of little drawers. The middle slot has nothing in it, you can see below, but above is a shot of it with the cigar case I turned into a ring box in it as it happened to just slide right in there like it was made for it.
A shot of the little drawers. The dust-looking residue on the bottom in front of the drawers...yeah, I don't know what that is. I wiped at it when I cleaned the whole thing up, but it didn't come off and I don't want to damage it. I'm thinking of trying a dab of furniture polish on it, though, to see if that fixes things.
What all do you find second-hand that is an amazing deal?
<3
WW
Part of it is the price, part is the fact that these things are perfectly good and need homes and a lot of great items get discarded just because they aren't someone's taste, and the other thing that factors into the fun is the thrill of the hunt. There's nothing like pawing through a huge pile of what appears to be crap and finding a Vera Wang skirt or a Wedgewood tea cup (true stories, guys, I've found both!)
With that out of the way, I'd like to show off my first of many, many editions to come of a Thrifted edition of the usual monthly random photo post!
This cup was found at a yard sale...I think I paid 25 cents for it. I loved the bright colors and the retro print!
This, I love ever so much. I bought two of these and, in fact, one is sitting right next to me with tea in it at the moment. They are the perfect size for tea and I think they are adorable. I got them at the same yard sale as the above one, and both were 50 cents, so that's less than a buck for 3 cups.
I am a fanatic of all things Batman. A fanatic who has no idea why my pictures look fine on my computer then once in a blue moon one comes out all odd like above the second I upload it to blogger. Penguin up there was 2 bucks, by the way. No, I will not be removing it from the packaging. What kind of nerd do you take me for?
This awsome little blacksmith I got from the guy who makes all the other awesome stuff I blogged about months ago at the local flea market. He's recently started adding in these little sculptures and this is my favorite one I've seen up there so far so I'm so very glad to have him.
These. Oh god, these. Aren't they cute?! I'm guessing these were from the '50s - '60s judging by the box they were in. It had no date on it, but they came in their original box. I paid a buck for them and they were still brand new, though I didn't get a picture of the box they came in as it was a bit beaten up. They fit, though, and are very cute and comfortable to wear around the house when its not quite cold enough for fuzzy slippers, but not quite warm enough for bare feet.
Monet print...$1. Yeah. Will probably be painting these frames, though, not a fan.
Other Monet print...Also $1. Beat that. Please excuse cat hanging from camera strap. These are older pictures. Cat attacked EVERYTHING.
Oh look! Another picture fucked up!
This jewelry box is one of my favorite things ever. Hubs bought this for me at the flea market as the second I saw it, I fell in love...I think his reasoning was it was probably easier to buy it then and there than to watch me lament over the loss of such a good find for the next month. That, and it was only $20 and it was near my birthday/a holiday (can't remember which, I'm good like that) It is leather-covered wood and, let me tell you, I can fit some serious goodies in here, this puppy is HUGE.
Shot of the top...The corner designs are sort of pressed in.
Doors open to reveal lots of little drawers. The middle slot has nothing in it, you can see below, but above is a shot of it with the cigar case I turned into a ring box in it as it happened to just slide right in there like it was made for it.
A shot of the little drawers. The dust-looking residue on the bottom in front of the drawers...yeah, I don't know what that is. I wiped at it when I cleaned the whole thing up, but it didn't come off and I don't want to damage it. I'm thinking of trying a dab of furniture polish on it, though, to see if that fixes things.
What all do you find second-hand that is an amazing deal?
<3
WW
Subscribe to:
Posts (Atom)