Tales of a Wookie Wife: Fueled by caffeine and good intentions. Feed hairy man. Clean house. Be fabulous. Repeat. You can learn more about me here.

Friday, July 27, 2012

DIY Vanity Container Set


Diving right in as this post is EXTREEEEMELY image heavy and log, but if you're in for the haul, grab a cup of tea and settle in!  It is worth it if I do say so myself!  This is a tutorial for these containers I DIY'd for my vanity.  I figure if I made my own set then I could just add on as my makeup collection grows! 

First off, get a container.  Whatever size or shape fits your needs will do.  This is just an old plastic container I'd cut to the height I need it to be. 


I wanted it to be sectioned, so I cut a few pieces of thin cardboard and put slits half-way down each in the middle so I could cross them like so:


Simple!


Next, I put a line of glue from a glue stick on the inside and outside of the top of the rim.


Then, I covered it with a piece of ribbon cut to length and folded in half so it sort of wraps around the edge and hides that ugly cut-off top part.  I held it in place with some tiny pins I had lying around so it could dry and was sure to put extra glue on the ends of the ribbon so it would lie down.


Next: Enter spray adhesive.  I didn't use this on the top part because I didn't want the inside to get sticky or glue-y.


I didn't want the ribbon to spiral, instead I wanted more of a linear, stripe pattern, so I cut strips to fit instead of wrapping and made sure to line all the seams up on the same side so they could all be turned to the back.


Here it is sitting up to dry.  Upside-down, hence the pins looking like feet.


Next, I got a smaller container.  This was from a super delicious Tiramisu gelato.


I trimmed off that odd edge thing where the lid had sat...And apparently swapped containers.  I had a few of these lying around to play with, which was good because I ended up having to throw one out due to an epic fail idea!


I grabbed some sprinkles and stuck them in a coffee filter.  You may be wondering where in the hell I'm going with this, but just hang with me.  :)


Next, I took some clear tape and cut it into strips the circumference of the little container and then dunked them into the sprinkles until they were covered...I probably should have used a used/dried out filter for color variation so its easier to see what's going on!  >.<


After covering the small container in spray glue and letting it sit up for 5 minutes, I wrapped the sprinkle-covered tape strips around the container so that sort of a sprinkle-sandwich was formed.


I added a bit of extra glue to fold in the bottom corners, as you can see on the top corners in the above photo.


Then, I added some clear nail polish over any exposed places on the sprinkles/tape/container, then applied glue to that top, ugly rim.

...And that I dipped in white glitter:


Container #2 Done!

Next, I wanted a small, shallow tray to hold my sponge eyeshadow applicators.  Those things need to be on hand, but are a pain to store in anything with a lid and get lost in the bottom of makeup bags.  I took another container identical to the previous one and trimmed just the bottom off of it to where it made a tiny tray.


Painted with silver glitter nail polish and done.


Here is the completed set!  The two little jars were just lying around and I wrapped a strip of ribbon around one and put a stripe of white glitter around the other.  All items got black/white doodads affixed to them as little decorations.


I love how it turned out, especially the sprinkle-covered one.


Some close-ups...


This way, as my makeup collection expands, I can just DIY more coordinating contaners as I need them.  The charm on the large container didn't photograph too well, but it is a horse shoe with skulls on the ends and a rose hanging off the U-part.  I did remove all of the pins except one that covers the seam in the back and the two up front that hold on the chain.  The rosette on the sprinkle container I just made by twisting then spiraling a leftover scrap of the damask ribbon!  ^_^


This sure did spice up my vanity tray!  It looks so much nicer now.  I'll post a picture once I have the whole thing organized how I want it.

In the mean-time, does it bother anyone else that makeup containers aren't usually very pretty?  That stuff generally gets left strewn all over the bathroom or dressing table for all to see, so it may as well be cute, right?

What do you think?

<3
Wookie Wifey

Hawaiian Tropic Silk Hydration Lotion Sunscreen - REVIEW

**Note, this product was provided for free via , Influenster opinions are solely my own.


This is one of the last things left to review from my Voxbox. 


 My take:

The first thing I noticed about this is that it isn't over-powering.  A lot of sunscreens have such a sickeningly sweet smell that, depending on my mood, it will either turn my stomach or make me crave candy.  This isn't like that at all.  It has a nice smell to it without being a punch in the nose.

The other thing I love about this is that it isn't greasy.  I am the world's worst about not wearing sunblock as often as I should because I HATE anything that leaves a greasy residue or a film on my skin.  This does neither.  It really does go on just like any normal lotion.

This stuff retails for about $8.99 a 6-ounce bottle, which I'd say is about normal for sunblock as it is generally pretty pricey.  Seeing as how it is one of the only truly non-greasy ones I've ever tried, I'd say it is worth it, though!  (Although it is advertised to also com in SPF 12 and 50 and if I purchase some I plan to get the 50 just for extra protection!)

I guess it goes without saying that I didn't burn with this on...If I had burned that would have been the FIRST thing I mentioned!  ^_^

<3
WW


Sunday, July 22, 2012

Breakfast Croissant Pouches


Damn, the things we make when we're REEALLLLY hungry, eh?


Simple one this time.  Lay out the dough and leave it in the 4 big rectangles instead of splitting it into the 8 small triangles.  I suppose you could make your own dough, but I don't have the space for something like that at this particular moment in time.  Soon, though...Soon...

Add turkey sausage (or whatever breakfast meat it is your family enjoys)...I left mine frozen because they were pre-cooked and warmed fine in the oven, but if you were using bacon or uncooked sausages, then cook it first.  Add some cheddar cheese and scrambled eggs (good way to use up leftovers).


Wrap them up.  Its early.  No one cares if they're pretty.  And you need more coffee.


Bake according to directions on croissant package.


Delicious.  Portable.

<3
WW

Friday, July 20, 2012

PORN! (of the food variety)

You guessed it, this month's random photo post is all about food porn!  Here's some snapshots of a few things I've made/cooked with lately.  ENJOY!  <3 <3 <3

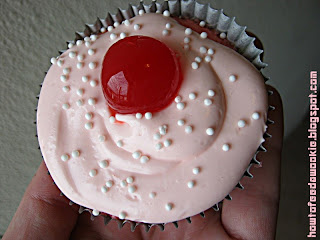
Link to the recipe and tutorial for the cupcakes at the bottom here for anyone interested!


These strawberries just had the most gorgeous color to them that I couldn't resist making them do a photo-shoot first...


Limited Edition?  You don't say...


Mmmm, maraschino cherry juice...Nectar of the baking gods.


Strawberry white chocolate fudge.


Grape tomatoes with parmesan, olive oil, and basil...Sort of a Caprese salad except I was out of mozzarella.  I get bonus points since I grew the basil myself, though, right?


Fresh grated Asiago cheese....mmmm....


<3
WW

Tuesday, July 17, 2012

Sally Hansen Magnetic Nail Color and Hand Creme! (REVIEW)

*Note:  Sally Hansen Magnetic Polish and Nails & Cuticles Hand Creme provided via Influenster and Sally Hansen - opinions is are belong to me.

Double review time, yay!  And I just noticed my title makes it sound like the hand creme is magnetic, too.  Which would explain a lot of magic shows I've seen were there such a thing.

Seriously, tho, where has the time gone?  I haven't posted in a week-ish and I haven't really been actually doing...anything.  A few small crafts here and there and a couple of recipes I still need to get around to posting, but other than that it just seems like I'm on a treadmill only without the bonus calorie loss.

Since I highly doubt you're here to hear me bitch, we'll get along with it!


I thought I'd have some not very nice things to say about this product.  I'd read of people trying the expensive alternatives and of them having a shit time with them and hardly getting any results from the magnets.  However, since this is a double review, let's get this little gem out of the way first:


Sally Hansen Nails & Cuticles Hand Creme

This one, I'm embarrassed to say, I was a bit confused by.   I didn't expect it to do a thing in the world for me.  I abuse my hands terribly.  I mean, terribly.  Like, if they could file for emancipation or abuse of their rights, I'm sure they would.  I do wash my hands and moisturize them with a regular lotion a lot afterwards, (I'm using Aveeno Stress Relief right now and have a small jar of Organics fig-pomegranate I keep in my bag), but I still generally have at least one hang nail at all times.  My cuticles peel, they look horrible.  Since I moisturize I didn't see why this was going to be so much different than my normal lotion/hand cremes I've tried.

But it is.

In the picture, I'd only been using the hand creme for a few days.  I've been using it for...

(sifting through old blot posts for a date...)

Ok, since the 7th.  So that's 10 days now.  Not one hang nail since I started using it, I shit you not.  I've enjoyed most of the products I've received from Influenster and their jolly band of stuff-giving-away cohorts, but this is THE one that I will be searching for when I run out.

My 1 oz sample is almost gone and I feel I now NEED this stuff.  I can remember having hang nails back into my early teens.  That means that for the first time in 15 years or so, no bloody, sore, swollen cuticles.  It sounds stupid, but I really had resigned myself to just having bad, ugly cuticles my entire life.  Not a deal-breaker, certainly, but still sucky and annoying.

This smells light, citrus-y, is not oily or greasy at all, is nice and thick, and doesn't leave you feeling like you either have to wash your hands or hold them in the air a-la surgeon style until they stop feeling funny after application.


Now, on to the Sally Hansen Magnetic Nail Color.  You can check them out here:  clickyclicky and this color I was sent is Polar Purple.

Note that the odd dings in the nail polish aren't the nail polish, that is my nails.  I told you I abuse them.  They peel off in layers vertically so it really sucks and makes them thin in spots.  Yes, I've tried vitamins.


 As you can see, they turned out brilliantly!  I was excited to get the Polar Purple as I don't have many purples in my collection yet.


Here's a close-up shot and you also may note that my cuticles look better here.  The first two pictures up top, you may notice I had fake nails on.  I did my toes on that day and, deciding that no one in their right mind would want to see my farmer's-tan feet, I waited 3 or 4 days and did my nails, thus the creme had a few more days to work.


One more shot.  LOVE this stuff.

<3
WW